
L45 Shell:
This page is dedicated to the construction of the L45 shell. For a detailed step by step account of how the shell can be built from kit form, you can down load the free L45-SAM from the Technical Information page!
I have developed the L45 Type Aircraft Nose Shell for my Home Built Flight Simulator. Feel free to contact me via ronjonrollo@yahoo.com for more information and availability.
L45 Shell details and Specs:
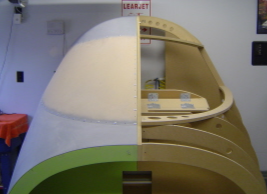
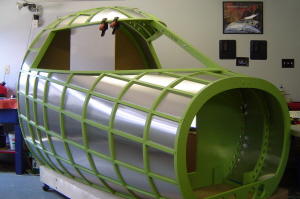
NOTE: These two pictures above illustrate the shell after completion of Phase 1 (Port side) which is bolted up to the completed (Starboard side) after all 10 Phases have been completed. The components seen here inside the cockpit are mock up items used to determine scale.
Phases of construction 1 thru 10:
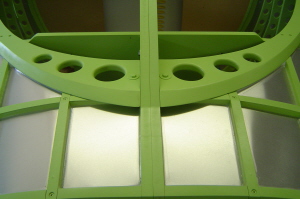
Phase 1: Temporarily assembling the main parts.
Phase 2: Bolting the ends of the frame sections.
Phase 3: Notching and installing the lateral strips.
Phase 4: Trimming the parts to match compound curves.
Phase 5: Caulking and painting the frame.
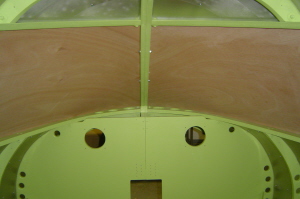
Phase 6: Installing aluminum sheeting between ribs.
Phase 7: Caulking and painting the aluminum sheeting.
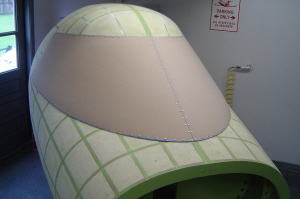
Phase 8: Installing and shaping the foam on outer shell.
Phase 9: Cover the shell with fiberglass and paint.
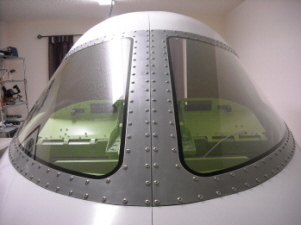
Phase 10: Installing the windscreen and trim!
How it's made & building materials:
The shell pieces are cut out of ¾ inch MDF (Medium Density Fiberboard) with JIGs and routers. The shell is designed to be strong enough for either a stationary
simulator or the demands of a full motion platform simulator. 100% of the attachment points were pre-drilled and fitted so that there was no guess work during
assembly.
Although the shell was set up in just a few hours, the pieces were all cut flat giving me the freedom of how I wanted to finish the frame. Examples I had to
choose from are a simple fabric covering, Monocot, aluminum and fiberglass. As we all know, it’s what’s on the inside that counts, however, I have shaped and shaved my shell, L45-002 so
that all the lines flow properly on the outside.
I have completed the L45SAM (Shell Assembly Manual) and it is available to the public as of January 1st, 2009. The SAM has step by step instructions and over 115 pages of illustrations to help everyone understand what is required to complete all 10 Phases on the build project. You can get your free down load of the SAM on the Technical Information page.
The wind screen at first seems like a challenge but is actually no big deal at all. Two 1/8th inch sheets of door skins are used as templates to fine tune the fit onto the shell. Once the fit is perfect and the majority of the heavy construction is complete, the Plexiglas can be installed and secured with screws every two inches. You can see the temporary windscreen in place through this website.
The nose avionics bay is a perfect place to house up to four computers. I also plan to use the forward bulkhead in the avionics bay as a place to attach modules, interface boards and various circuit boards. Under the floor of the avionics bay is a great place for surge protectors, fans and airflow handlers.
I designed my shell to be moved through any door of a residence for easy setup. The shell can also be split in two sections, the port side and starboard side and then bolted together once it is in it's new home.
Basic Dimensional Information:
The LJ45 Shell is oval shaped and is a fairly complex item to build from scratch. The following information is in no way a complete representation of the shell but gives you an idea of the sizes involved in the nose section of the shell.
Total Length: 78.75"
Total Height: 64.00"
Total Width (at widest point): 64.75"
Height at nose: 35.00"
Width at nose (at widest point): 49.50"
Door Width: 22.00"
Door Height: 61.00"
Column Spacing on center: 28.00"
L45 Parts list for the Shell:
To find out what is included in a L45 kit, go to the Technical Information page and down load the L45-SAM. A detailed list of part can be found on page 120.
March 2008: My Shell (L45-002)…
After the “jigs” were finished, I cut out the port and the starboard sides of my shell with a jigsaw and router. I put the port side together first, which I was used to seeing up to this point. Then I assembled the starboard half and pushed the two sides together. Wow! Sometimes I even impress myself!
Please let me take this opportunity to say that I am just one guy with a few common hand tools in the back garage. I don’t have a team of engineers working with me and all the fancy machining tools, space or money required to build perfection. Keep in mind that this is a hobby and I built this for two reasons. Obviously the first would be for my own personal use. Second, for anyone else who has the same dreams and desires as I do to create a home built flight simulator. With that being said, the next few months will be spent working on other builder’s shells.


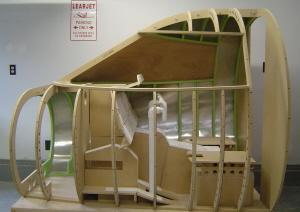
May 2008: "Mock Up" internal components...
I found the time to do some very important “mock up” work inside the shell. My goal was to make a full scale ergonomically correct model of all the major internal components to insure proper fit, angles and dimensions. I spent approximately 60 hours and $100 which was time and money well spent. I discovered countless issues that were undetectable by just looking at our known photo data banks. It only made sense to do the trial and error with MDF, PVC, foam board and paper rather than aluminum parts. Here are a few pictures of the full scale mock up L45 cockpit. (Keep in mind that the dimensions have changed slightly even since this pictures.)

June 2008: Research and development...
I'll be fine tuning my measurements on the mock up components and sending this information to Eric Tomlin so that he can transfer the information to Auto CAD files. From there, these files will be sent to J.C. where he is supposed to be fabricating most of the internal parts with aircraft aluminum. I will also be working to advance my shell, L45-002 in the meantime.
July 2008: Focused on L45-002...
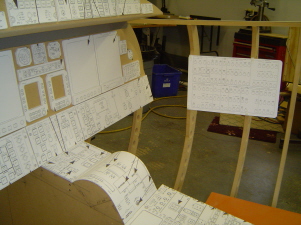
I have been working hard on L45-002 and just completed Phase 5 of 10. As I am making progress on my shell, I have been taking notes and photographs for the L45-SAM (Shell Assembly Manual). To date, there are two revisions for the other builders who already have a shell. I have designed the shell to be completed in 10 Phases, see the "Technical Info" page for more details.
Keep in mind that just the shell construction will take up to a year to complete. To date, I am slightly ahead of schedule and that's with building a set of Jigs, three kits and an Assembly Manual! Here are a few pictures of L45-002 sitting pretty before Phase 6.
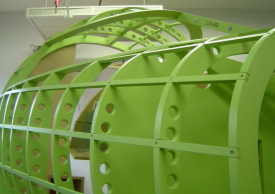

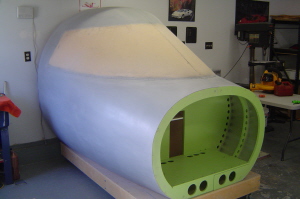
August 2008: The aluminum work is complete...
I made some serious progress over the past four weeks to the point that I feel comfortable setting a completion date of 01-01-2009 for the shell if all goes well. Recently, I have completed Phases 6 and 7 which brings me to Phase 8, Foaming!
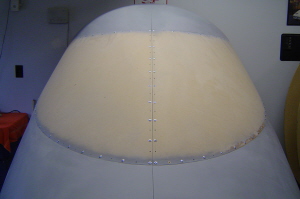
September 2008: Fiberglass and shell progress...
The foam is in place, sanded down and read for the fiberglass. Many of you may have wondered how the Windscreen is going to work on this shell. It's not by accident that these 1/8th inch templates (door skins) fit the shell like a glove! Because the center post and the rear Windscreen frames are perfectly flat, it is like wrapping paper around a funnel! Here you can see that the windscreen templates and the 80 screws to each are also in place.
I have worked with fiberglass in the past but never on such a large scale. The fiberglass work will require approximately 120 square feet of fiberglass matting which will cover the shell two full times and six gallons of resin in order to get the job done right. It is very messy and can be hazardous to ones health if proper precautions are not taken to say the least.
I have also decided to go with a U.S. Naval Aviation theme for the simulator. I plan to paint the shell a semigloss white. In the meantime, take a look at the progress!
December 2008: The fiberglass work is finished!
It took me a year but I did it! I recently finished all the fiberglass work on my shell, L45-002, and now I am looking forward to some of the fun stuff. Over the next few weeks, I will be painting the exterior of the shell a semigloss white with a blue stripe down both sides. I will fit the windscreens in after that. I have also started engineering and building the flight control columns. Take a look at these pictures of the shell.
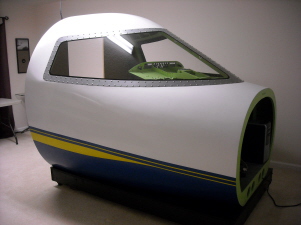
February 15th 2010: The L45 shell is complete!
I know it looks like I took 14 months off of the project especially when you see that the last time I updated the progress on my shell was back in December 2008. But if you have been following my progress, you know I have been busy with other issues within the Project45. In any case, shell L45-002 is finally completed! I choose the colors "Blue and Gold" because of my time spent in the U.S.N.R., but I kept the business jet look. Also, the windscreens turned out perfectly!
Registration list of the PROJECT45 L45 airframe:
Ron Rollo Jr. Florida USA L45-000 (CRT)
Ron Rollo Jr. Florida USA L45-001 (JIGS)
Ron Rollo Jr. Florida USA L45-002 (Flag)
Mike Badger Georgia USA L45-003 (Kit)
Joseph C. Texas USA L45-004 (Kit)
Rick Trantham Minnesota USA L45-005 (Kit)
Tom Goldberg Washington USA L45-006 (Kit)
Shane Barnes Kentucky USA L45-007 (Kit)
Randy Buchanan Colorado USA L45-008 (Kit)
Willie Wilson Texas USA L45-009 (Plans)
Mike Todd Texas USA L45-010 (Kit)
Steve Cooke California USA L45-011 (Kit)
Mark Speechley Victoria Australia L45-012 (Plans)
Maciej Muranowski Virginia USA L45-013 (Plans)
Tommy Miller California USA L45-014 (Plans)
Joao Lopes Sintra Portugal L45-015 (Plans)
Steve Muzyka Ontario Canada L45-016 (Kit)
Rob Archer Indiana USA L45-017 (Plans)
Thomas Hjortby Vejle Denmark L45-018 (Plans)
Justin Fletcher Florida USA L45-019 (Kit)
Jeff Peters Alberta Canada L45-020 (Kit)
Neil Hewitt London U.K. L45-021 (Plans)
David Lachmann Barranquilla Colombia L45-022 (Plans)
Greg Hickey Ohio USA L45-023 (Plans)
Mathew Budden Queensland Australia L45-024 (Plans)
Nestor Gutierrez Barcelona Spain L45-025 (Plans)
Kurt Rauchberger Domat Switzerland L45-026 (Plans)
Dennis Jacobs Missouri USA L45-027 (Plans)
Andreas Maurer Nurnberg Germany L45-028 (Plans)
Jan-Hendrik Tutt Hamburg Germany L45-029 (Plans)
Will Sasse Victoria Australia L45-030 (Plans)
Dirk Koehne Bonn Germany L45-031 (Plans)
Roel Vercammen The Netherlands L45-032 (Plans)
Jose Garcia Puerto Rico USA L45-033 (Plans)
Uzi Talit Florida USA L45-034 (Kit)
Thomas Fiume Pennsylvania USA L45-035 (Plans)
Maciej Bieniaszewski Torun Poland L45-036 (Plans)
Andrew Brown Louisiana USA L45-037 (Plans)
Terry Collins Kallaroo Australia L45-038 (Plans)
DonnyRay Jones South Carolina USA L45-1001 (Reg)

Contact Us Today!
Email:
Please visit Hangar45 for all the latest news in the Lear45 simulation world. There you can meet with all the L45 builders and watch their projects unfold!

Project45 Products and Pricing Page coming soon!
"In the meantime, please email me for the latest Project45 Products and Pricing Guide and I will get a PDF copy out to you ASAP!"